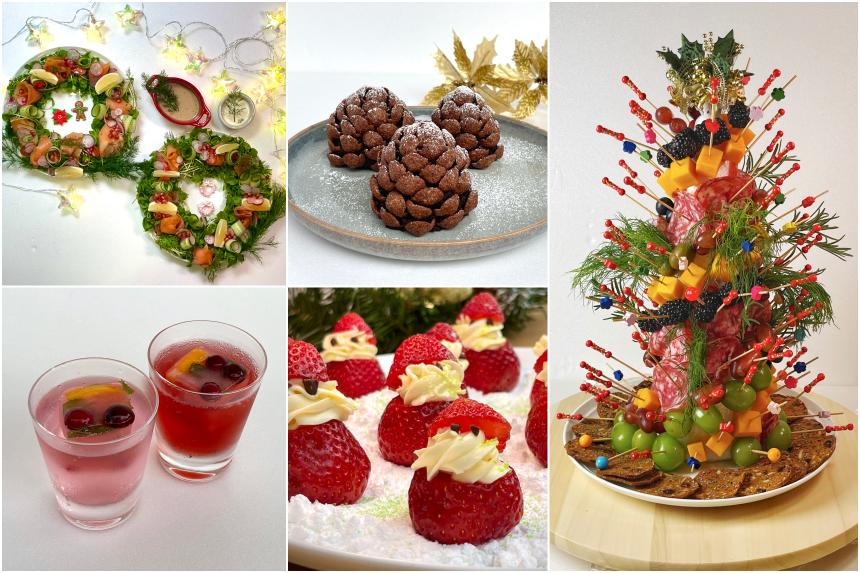

SINGAPORE – Hosting parties at home? Impress your guests with trending treats that you can rustle up on your own.
Strawberry Santas and brownies shaped like pine cones are bound to please both children and grown-ups. The hefty pine cones make a suitable party favour too.
For a casual get-together with light bites, the charcuterie tree is a worthy centrepiece and the edible smoked salmon wreath is easy to assemble.
Fruity ice cubes add a festive touch to both alcoholic and non-alcoholic drinks.
Here are five fun recipes to try.
• Follow Hedy Khoo on Instagram @hedchefhedykhoo. Go to straitstimesfood.com for recipes, news on the latest food trends and more. Follow our social media accounts on Instagram and Facebook @straitstimesfood.
Strawberry Santas

Medium- and large-sized strawberries work best for preparing this cute dish of strawberry Santas.
There are several recipes for Strawberry Claus or Strawberry Santa online. Some call for the use of whipped cream, but I find it melts easily, especially in Singapore’s weather.
Cream cheese makes for a sturdier frosting as recommended in a recipe on website Healthy Food Guide (str.sg/ifwv).
The downside is that the thicker texture makes it harder to squeeze it out from a piping bag.
Online recipes suggest using a disposable resealable bag as a piping bag, but it does not work for me. The resealable bag burst before I complete the first Strawberry Santa, so it is best to use a piping bag.
For the eyes, I buy a chocolate decorative pen, thinking it would be a convenient option, but it did not work. The chocolate in the decorative pen is so solidified, it is hard to pipe out the eyes.
A tedious, but doable, way to make the eyes is to use a pair of scissors to snip chocolate chips into bits. As I do not have a pair of tweezers, I use a pair of chopsticks to stick on the bits onto the frosting.
Alternatively, use chocolate sprinkles for the eyes.
For a snowy backdrop, spoon more icing sugar onto the plate, around the Strawberry Santas.
I use light green sanding sugar sprinkles to dust the plate for extra glitter.
Ingredients
500g strawberries (about 28 medium-sized ones)
3 chocolate chips
226g cream cheese
3 Tbs icing sugar
¼ tsp vanilla extract
Method
1. Remove the leaves and wash the strawberries, discarding those with any rotten bits and setting aside the overripe ones.
2. Dry them and set aside.
3. Snip the chocolate chips into bits to use as eyes for the Strawberry Santas. Set aside.
4. Cut the cream cheese into cubes and place in a stand mixer.
5. Add the icing sugar and beat until smooth.
6. Add vanilla extract and beat for another minute.
7. Transfer the cream cheese frosting into a piping bag fitted with a medium-sized star tip.
8. Slice a third off the tip of each strawberry and set aside. These will be used as the Santa hats.
9. Place the strawberries on their bases on a plate.
10. Pipe the frosting onto the cut side of the strawberry.
11. Place the cut strawberry tips on top of the frosting.
12. Use a pair of tweezers or chopsticks to place two chocolate chip bits in the frosting of each strawberry to make the eyes.
13. Use a sieve to dust the Strawberry Santas with a little icing sugar if preferred.
14. Serve immediately.
Makes 28 pieces.
Smoked Salmon Salad Wreath
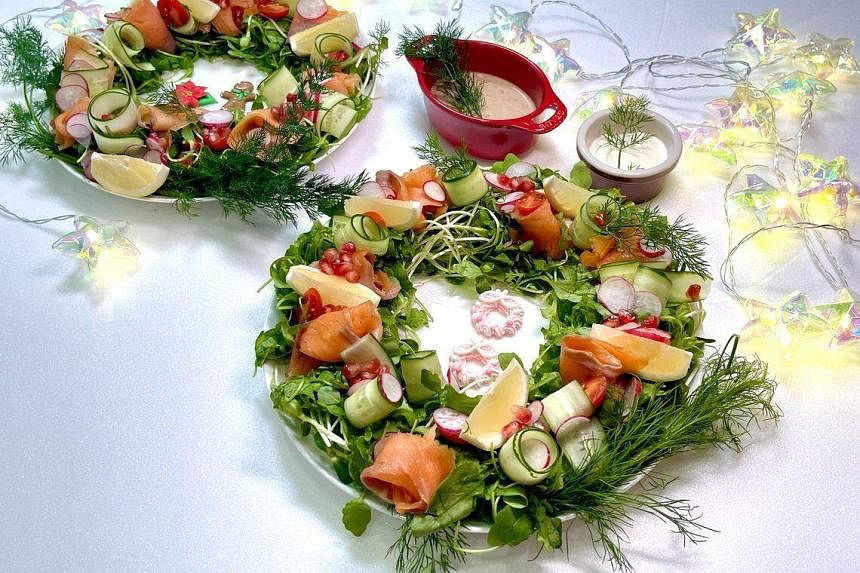
This edible wreath is so pretty, I wish I could hang it up on my front door. But as part of the dinner table spread, the smoked salmon wreath is a great way to welcome guests into your home.
I use rocket leaves and sunflower shoots to make up the base of the wreath, but you can use any salad leaves available in the supermarket. Just be sure to wash and dry them thoroughly before use if they are not prewashed.
If you do not like smoked salmon, replace it with fruit or cold cuts.
If there is sufficient space in the fridge, prepare the wreath ahead of time and cover it loosely with clingwrap until ready to serve. Layer on the smoked salmon just before serving, so it does not dry out in the fridge.
Pomegranate seeds and red radish slices add bright pops of colour to the wreath.
Use any salad dressing of your choice – my pick was store-bought roasted sesame dressing – and serve it on the side. When adding dressing to the wreath, do it sparingly and just before serving so it will not weigh down the salad leaves.
Ingredients

2 small cucumbers (150g)
125g rocket leaves
170g sunflower shoots
300g smoked salmon
6 cherry tomatoes, halved
80g red radish, sliced thinly
25g dill
1 lemon, sliced into eight pieces
2 Tbs pomegranate seeds
150ml salad dressing
What you will need
Two white plates
Method
1. Use a vegetable peeler to peel the cucumber lengthwise into long, thin slices to make cucumber ribbons.
2. On each plate, arrange the rocket leaves and sunflower shoots into a circle, leaving the centre empty.
3. Roll up the smoked salmon slices and place them around the wreath.
4. Roll up the cucumber ribbons and place them around the wreath too.
5. Decorate the wreaths with the cherry tomatoes and red radish slices.
6. Arrange the dill on the wreaths.
7. Place the lemon slices around the wreath.
8. Use pomegranate seeds to accent the dish.
9. Serve the salad dressing on the side.
Serves six to eight
Charcuterie Tree
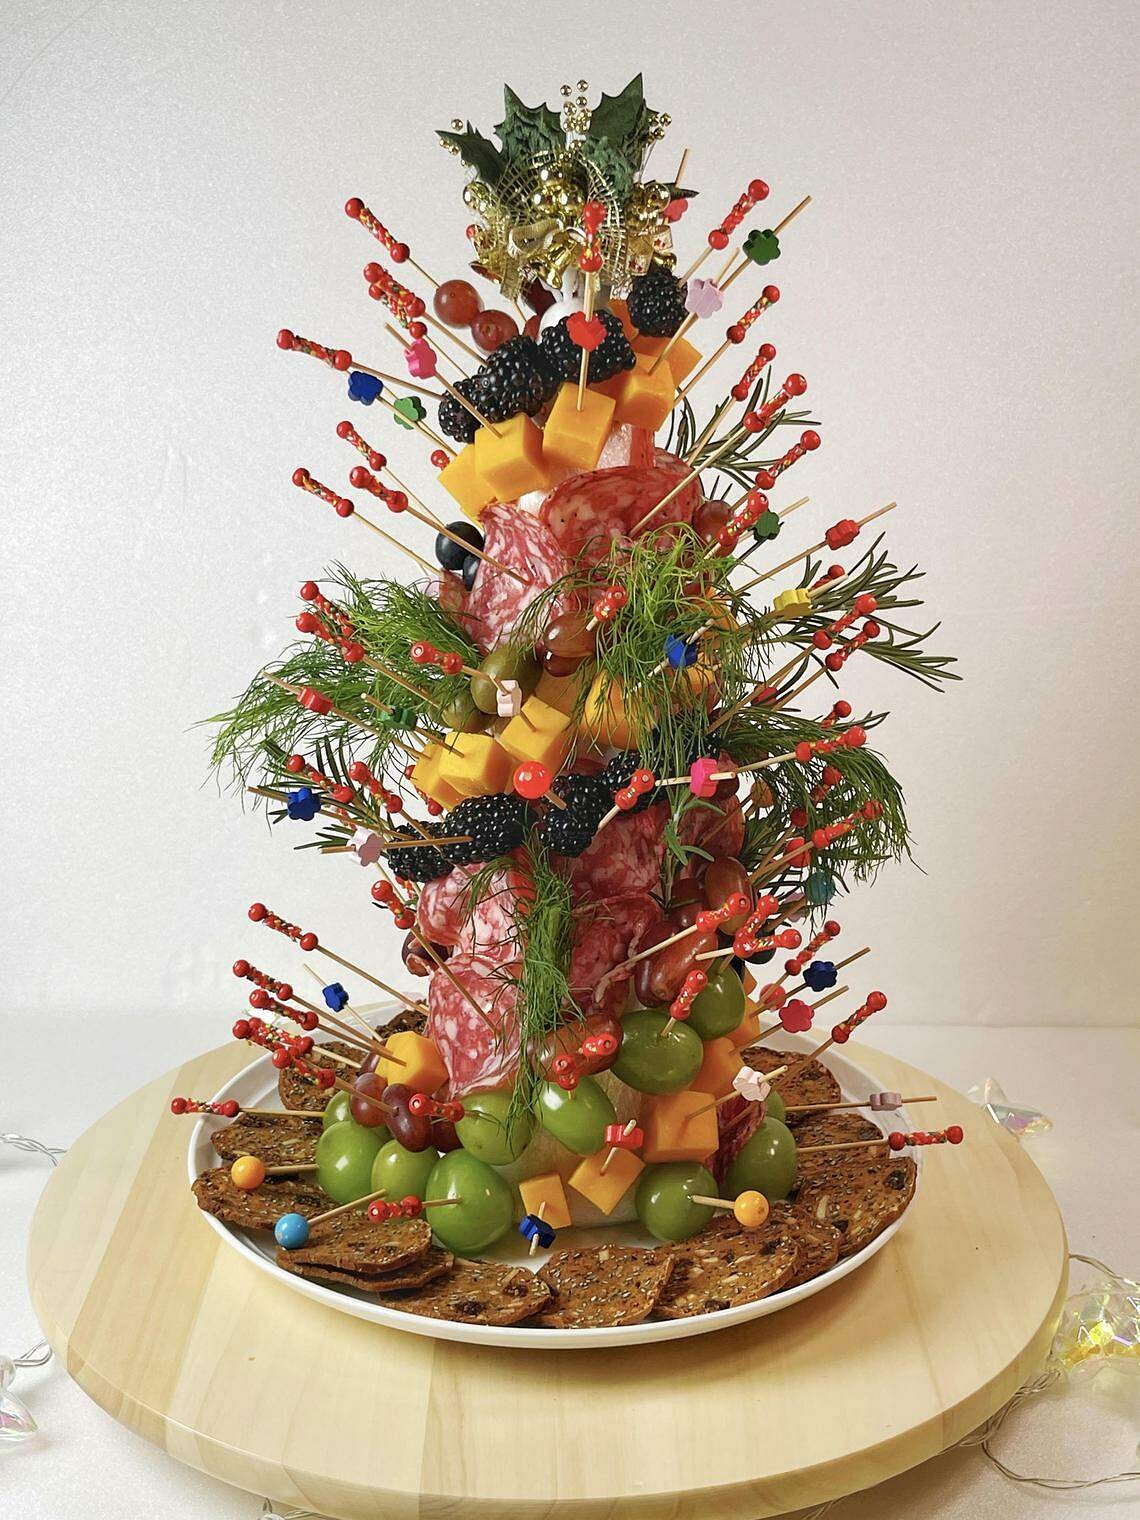
If you are planning a simple cocktail party with no heavy main courses, a charcuterie tree is a fun centrepiece and conversation starter.
No cooking is involved, but assembling the tree is time-consuming.
Get someone to help spear the ingredients with toothpicks, while you focus on sticking them to the trunk.
The main concern is food safety, as it takes a while to complete assembly and you want to minimise the time that raw food is outside the fridge.
Tip: Keep the cheese and salami in the fridge until you are ready to tack them onto the tree.
There are no hard and fast rules when it comes to the type of cheese to use, but do consider its texture. Are you able to spear the cheese with a toothpick without it falling apart? Cheddar is a safe bet. Buy a chunk so that you can cut it into cubes.
If possible, use decorative toothpicks as they are visually more appealing than bare toothpicks. Also, remember to drain the olives and make sure the grapes and berries are dry before tacking them onto the tree.
Make the charcuterie tree as close to serving time as possible. And keep it covered in clingwrap when storing in the fridge.
Ingredients
250g green olives
250g kalamata olives
330g green grapes
300g red grapes
300g blackberries
300g blueberries
225g chunk of cheddar, cut into bite-sized 2cm cubes
100g salami
30g rosemary stalks
30g dill stalks
Optional: Crackers
What you will need
A styrofoam cone (33cm in height, with an 11cm diameter at the bottom)
Clingwrap
Toothpicks
Method
1. Wrap the styrofoam cone in clingwrap.
2. Place the cone on a plate.
3. Pierce a toothpick through the ingredients and stick them in a spiral pattern to the tree. Use heavier items, such as bigger grapes, at the bottom so the cone balances better.
4. Once you are done sticking on the ingredients, fill the gaps with the rosemary stalks and dill.
5. Decorate the plate with crackers at the base of the tree.
Serves four to five
Pine cone brownies

Captivate your guests with these brownies in the shape of pine cones, which will be instant social media hits.
Dessert designer and blogger Emma Wills shared a recipe on Nov 6 on her site Ems Foodie Fix (str.sg/if5J).
Her recipe is straightforward, but I find the amount of sugar far more than what I would usually use for making brownies.
Her brownies are filled with caramel, which I choose to omit because it sounds like a sugar bomb requiring many more steps.
Baking the brownie is not difficult, but as I cut down on the sugar, the result is a tad dry. Her recipe calls for it to be baked for 25 minutes, but I find 22 to 23 minutes is sufficient.
To counter the dry texture, I add Cointreau, which gives the brownie an alcoholic and orangey lift. You can also add frosting to the mix if you want to omit alcohol.
Mashing the brownie and shaping it into little cones take some time.
Do not worry about measuring out six exact portions – it is fine if the pine cones are not identical in size.
Use a little pressure to press the brownie mixture and make it compact, so that it does not break apart when you embed the cereal. Chilling the cones before spiking in the pieces of cereal is an important step as you need the brownie cones to have a firm texture.
Inserting the cereal into the brownie cones to form pine cones is time-consuming, so give yourself at least an hour for this step.
After you complete inserting the cereal pieces, place the pine cone brownies in airtight containers and stick them in the fridge to let them set. You may want to prepare them a day ahead.
Ingredients
170g butter
200g dark chocolate callets
3 eggs
120g caster sugar
30g light brown sugar
1 Tbs vanilla extract
160g plain flour
50g cocoa powder
½ tsp salt
3 Tbs Cointreau
100g KoKo Krunch cereal
Method
1. Preheat the oven to 180 deg C while you prepare the brownie batter.
2. Place the butter and dark chocolate callets in a heatproof bowl. Place the bowl over a saucepan of simmering water over low heat. The water should not touch the base of the bowl.
3. Heat the mixture until melted. Remove the bowl from the heat and allow it to cool.
4. Use a handheld mixer or stand mixer to beat the eggs, sugar and vanilla extract.
5. Fold the slightly cooled chocolate butter mixture into the egg mixture.
6. Sieve the flour and cocoa powder together.
7. Add the flour, cocoa powder and salt into the wet ingredients, taking care not to overbeat the mixture.
8. Line a baking pan with baking paper. Pour in the batter.
9. Lower the heat of the oven to 170 deg C. Place the baking pan in the oven and bake for 22 to 23 minutes.
10. Remove the baking pan from the oven and allow the brownie to cool down.
11. Slice the crusts off the top and sides of the brownie. Either discard or eat as a snack.
12. Break the brownie up into a bowl. Add the Cointreau and mash the mixture together.
13. Divide the brownie mixture into six parts and roll each portion into a conical shape with a flat base.
14. Place the brownie cones in the fridge for three hours to allow their texture to firm up.
15. Insert the cereal pieces into the brownie cone, starting from the top, working in rows until the brownie resembles a pine cone.
16. Place the pine cones in the fridge to allow them to firm up completely and prevent the cereal from falling out.
17. When serving, dust a little icing sugar over the brownie pine cones to create a snowy effect.
Makes six pieces
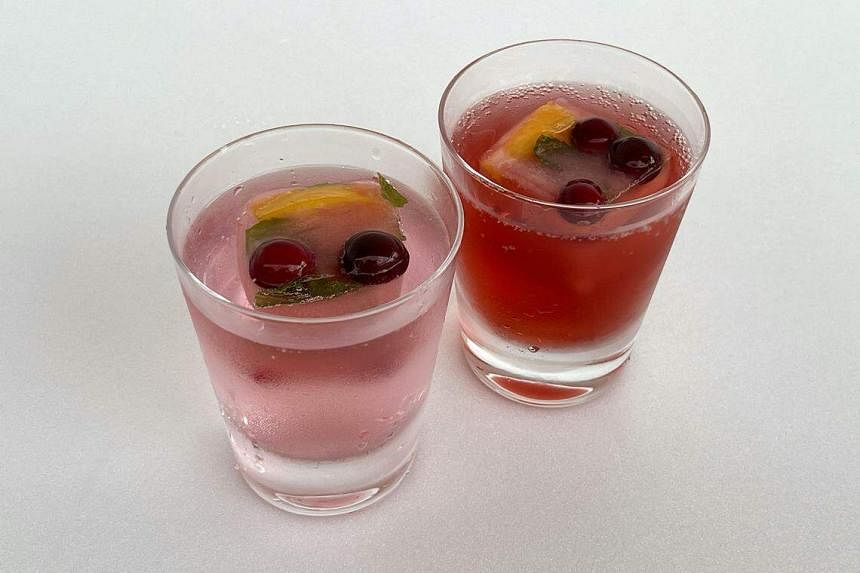
Holiday fruity ice cubes

Jazz up your beverages, both alcoholic and non-alcoholic, with these pretty ice cubes filled with fruit.
Food blogger Nicole Modic put up a blog post on Kalejunkie for her holiday pomegranate ice cubes in December 2022 (str.sg/ifSc) and I dare say these ice cubes will not go out of style any time soon.
She uses four ingredients for her pomegranate ice cubes: fresh cranberries, orange, rosemary and pomegranate juice.
While rosemary does better in aesthetics, I find its woody herbaceous aroma a tad overpowering for cocktails and mocktails.
Fresh mint leaves work better for me.
I also add pomegranate seeds for more colour and crunch.
To avoid too much sugar in your drink, go for juice that has no sugar added.
Modic recommends ice trays with lids as they prevent your ingredients from spilling in the freezer.
I find large silicone ice-cube trays or moulds with lids more suitable if you want to stuff more fruit into each ice cube.
Use regular-sized ice-cube trays if you intend to use your fruity ice cubes in champagne flutes or highball glasses.
Once the ice cubes are properly frozen, you can use them for dressing up your drinks.
You can use the smaller ice cubes with prosecco or sparkling wine. As the cubes melt, they impart a fruity aroma and flavour to the prosecco.
For non-alcoholic beverages, serve the ice cubes with tonic water or sparkling water. As the cranberry pomegranate ice cubes melt, they add a lovely pink hue to the drink. Or fill the glass with juice, then top it off with some tonic water or sparkling water for a bubbly effect.
Ingredients
Fresh cranberries (washed)
Pomegranate seeds
1 orange (cut into small pieces, including the orange peel)
Fresh mint leaves
Cranberry pomegranate juice without added sugar
Method

1. Place one or two cranberries and a few pomegranate seeds in each cavity of the ice-cube tray.
2. Add a piece of orange and one or two mint leaves.
3. Fill up the cavity up to three quarters with the cranberry pomegranate juice.
4. Freeze the ice cubes overnight.